Mineral cosmetics are often dismissed from the start due to their loose formula. They seem difficult to use, require special tools, and the final effect, if applied incorrectly, can sometimes be disappointing. How do you properly apply mineral foundation to achieve the most natural effect possible? And is applying loose minerals really that difficult and something to be afraid of?
Mineral cosmetics are certainly different to use than liquid foundations you can buy at the drugstore. They require different application techniques, thorough blending of the pigment, and the purchase of high-quality accessories. However, they surpass traditional makeup in many respects. Their advantages include a short list of ingredients, a wide range of colors, excellent skin-matching properties, a natural-looking finish, and effective camouflage of imperfections. Contrary to popular belief, it's much more difficult to apply mineral foundation unevenly than liquid foundation, which can be applied with fingers. Not all textures respond well to the warmth of your fingers, making it much easier to smudge, bleed, provide poor coverage, not blend well with the skin, and oxidize the color in liquid products. Loose minerals have a sheer formula and require the use of brushes or sponges to evenly distribute the foundation.
Mineral foundation can be applied in many ways, achieving a completely different end result. The loose formula also opens up many unconventional uses for foundation. You can enrich your favorite cream or even a light-coverage fluid with natural mineral pigments to increase coverage and visibly even out skin tone. This is a particularly good solution for those who don't like loose formulas or don't want to invest in cosmetic accessories.
How to apply?
There are two main techniques for applying foundation – dry and wet . The coverage depends on the accessory used – the brush, its shape, density, softness, or sponges – in which case, the final effect is determined by their porosity and the presence of moisture (wet) or lack thereof (dry).
Which app is for whom?
Applying foundation wet typically intensifies its coverage and more accurately imitates skin texture, as wet pigments adapt and adhere better to the skin. This method typically extends makeup wear (the foundation is more closely bonded to the skin), although the opposite can sometimes occur, for example, in cases of seborrhea or very oily skin. In such cases, traditional dry application works much better. The wet method binds the pigments, resulting in better coverage, but also requires more precise blending (the high pigment concentration can easily create streaks and spots) and can accentuate uneven skin texture. This is a great method for those who require high coverage but also have relatively even skin and don't struggle with overactive sebaceous glands. The final result depends primarily on how and in what quantity the foundation is applied.
Applying mineral powders dry provides less coverage and requires more hydration, but it also helps maintain a matte finish for longer (if your skin is oily and this is a significant problem) and reduces the appearance of imperfections—scars, small holes, and enlarged pores. However, uneven application can accentuate imperfections, so when blending powders traditionally, be very thorough.

Applying minerals, whether wet or dry, requires well-prepared skin. Here, a skincare routine that meets your current needs plays a key role.
Moderation is also crucial when applying minerals. Applying too much product can cause the foundation to clump, run, cause the skin to become oily, reduce its durability, create a mask-like effect, streak, or blotchiness. Remember that it's much better to build coverage with thin layers than to apply too much product at once – such concentrated, dense powder (especially when applied wet) is very difficult to blend evenly, and the final effect isn't as natural as when applied in layers.
How to apply foundation with a flat top brush?
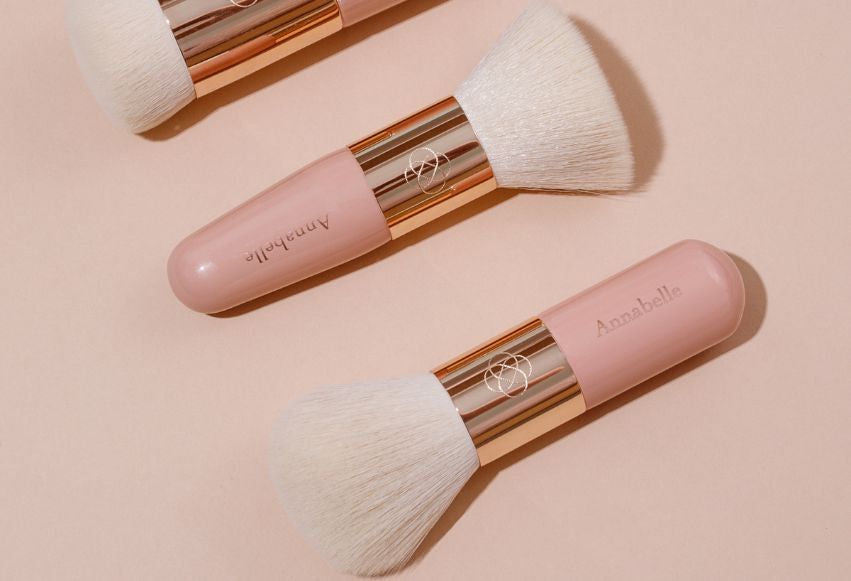
A flat-top brush has a flat tip and a large bristle surface that you can manipulate – the smaller the bristles, the more precise the brush, the faster you'll apply foundation. However, you may have trouble blending the product evenly in areas like the nose or under the eyes. Therefore, it's best to choose a medium-sized brush, which will be suitable not only for applying foundation to the entire face but will also easily be used as an accessory for powder, blush, or bronzer. Simply work with the side of the brush or half the bristles. The Annabelle Minerals flat-top brush has a very good size and a generous amount of bristles. Importantly, the bristles aren't too long. The fewer bristles, the more subtle the product application, but there's a high probability of uneven color concentration – a larger number of bristles means better blending. When choosing the right accessory for applying mineral foundations, make sure it has plenty of bristles, isn't too large, and isn't too long. Otherwise, most of the foundation will end up inside the brush, and the tool itself won't deliver it to the skin.

Dry application: Pour a small amount of mineral foundation onto a lid or saucer, dip the brush in it, and use circular motions. To prevent product from falling out, gently tap the brush handle against a flat surface to allow the powder to blend into the bristles. After completing these simple steps, you can move on to applying your makeup. Depending on the desired effect, you can:
- circular movements – distribute the foundation very precisely and allow you to build coverage,
- stamping movements – increase coverage and do not disturb the layer under the foundation, which is extremely important when using protective creams at the same time,
- long, sliding movements – you will apply the foundation very precisely in hard-to-reach places (e.g. around the nose), also with foundations that do not like circular movements, are prone to abrasion, and have poor coverage.
The more opaque the foundation, the more intense and blending the movements should be; the weaker the movements, the more concentrated and stamping.
The direction in which you apply foundation is also crucial. Since the T-zone is usually the most problematic area of the face, especially the chin, nasolabial folds, and the nose itself, I recommend starting there. Foundation rubs off and sets easily there, so it's worth trying a circular application from the nasolabial folds and the area around the mouth, moving to the sides of the face, and finally to the forehead. It's also a good idea to start with the jawline and work upwards. Starting with the forehead or cheeks makes it more difficult to spread foundation evenly and blend it in the center of the face, which is where it should look perfect. You can set the foundation with powder, but it's not necessary, as mineral foundation also acts as a finishing powder.
The dry method is suitable for most skin types. It requires proper skin preparation and can accentuate dry patches and dehydrated skin texture. If applied evenly, the foundation doesn't emphasize scars and provides a very good mattifying effect, especially when applied over a primer, such as Annabelle Minerals clay powder . It doesn't emphasize dents.
Wet application: You can proceed similarly to dry application, but immediately before application, spritz the brush with a moisturizing mist or thermal water, or dampen it with water first. Then, with the damp bristles, press the foundation in with the brush. The first method provides more coverage. The second method provides a wetter effect and the foundation blends more deeply into the skin, but it is also more difficult to apply because it can streak. Finish the foundation with a powder. Depending on the desired finish, use Pretty Glow illuminating powder for a healthy glow, or Pretty Matte mattifying powder/Pretty Neutral clay powder, which will camouflage enlarged pores and minor scars that foundation applied this way could otherwise highlight.
The wet method is best for achieving very good coverage. It effectively conceals most imperfections, but it can accentuate sunken imperfections. With high coverage, there's also the risk of applying too much foundation, which may not look natural.
How to apply foundation with a kabuki brush?
Unlike a traditional flat-top brush, an oval-shaped kabuki brush doesn't have a pointed surface. It's gently rounded, with shorter bristles on the edges that blend foundation very precisely and prevent over-application. The brush itself is slightly smaller, making it easier to use on the face, nose, and lips. A kabuki brush will achieve slightly less coverage, but it will blend foundation much more effectively. It's perfect for circular foundation application, as you're working not only with the flat bristles but also with the shorter bristles on the edges, which blend the mineral powder even more thoroughly into the skin. The more coverage you want, the more bristles the brush should have, and the bristles themselves should be shorter. The Annabelle Minerals Kabuki brush has a fair amount of bristles, but has slightly longer bristles, so it applies foundation more subtly and blends it into the skin very well. If you're looking for less coverage but still good coverage, or you're having trouble blending your foundation, a kabuki brush is a great investment. You can use a kabuki brush to apply all loose face makeup products—foundation, powder, blush, bronzer, and even highlighter.

Dry application: The procedure is similar to applying with a flat top brush, but with this bristle arrangement, it's also worth blending the foundation more thoroughly on the sides of the brush, as they also work on the skin. Due to its shape, a kabuki brush prefers circular movements, easily blending even more opaque foundation, whereas applying with a flat top can result in uneven color concentration. It provides slightly less coverage, but it feels natural, and the foundation itself is pressed into the skin much more effectively, thus maintaining a matte effect for longer. However, such application can accentuate dry patches, dry blemishes, and create a slightly powdery, dry finish. Therefore, when applying minerals dry, regardless of the brush, basic skincare routine plays a key role.
This method is best for most skin types and shades, providing less coverage for imperfections (but still very good coverage). It works well for beginners and when using the full-coverage formula of Annabelle Minerals foundation. It doesn't emphasize blemishes or enlarged pores, and it provides a good mattifying effect.
Wet application: The mechanism is the same, and the brush shape prevents streaking, which can occur if the brush is very wet. Those unfamiliar with applying foundation will notice a significant difference between applying foundation with a flat top brush and a kabuki brush. The bristles don't create streaks (unless the strokes are imprecise) and don't leave dark spots because you're working with the entire brush, not just the flat surface. A kabuki brush also has a lower tendency to highlight pores and creases. Due to its shape, it's difficult to apply too much foundation. The only downside is its lower coverage, and too long, wide, and fast strokes can lead to foundation rubbing off.
This method is best for those who want strong, yet natural coverage. The kabuki brush is the best solution for those who are inexperienced and struggle with blending foundation, but also tend to apply too much.
How to apply foundation with a sponge?
Thanks to their delicate and velvety texture, Softie makeup sponges allow you to apply your favorite mineral foundation naturally and effortlessly. You don't have to sacrifice medium coverage, which will effortlessly even out your skin tone and conceal most imperfections.
Applying with a sponge is ideal for anyone who finds dry mineral powders a powdery, dry effect, while applying them wet doesn't quite achieve the desired effect, creating streaks that are difficult to blend and preventing the minerals from blending seamlessly with the skin. A sponge allows you to achieve a perfectly natural, slightly wet look while also eliminating the powdery nature of your foundation. Minerals are more delicate and dense when in contact with water, which translates to greater coverage. Traditional brush application often releases too much product onto the skin, so there's no need to strive for a mask-like effect if your movements are poor or you tend to use too much powder, which requires thinner layers. Softie sponges don't absorb much foundation (but more than brushes), preventing the application of too much powder onto the skin. If you're looking for a very natural effect while still covering imperfections, applying minerals with a sponge might be the way to go. The sponge also removes the powdery, dry look of foundation. Some skin types may find that this application method makes their makeup last longer. You can use a sponge to apply not only foundation, but also loose and creamy blush, bronzer, concealer, and highlighter.

Wet application: Before applying foundation, soak the sponge in water, squeeze out excess water, and gently press it onto the lid where you poured the foundation. I also like to press the sponge with the foundation in place to make the powder more pliable and less dry. You can skip this step, as this will increase coverage, but the foundation may become denser and more difficult to apply than a wetter one. Pressing the foundation into the sponge also makes it easier to build coverage. I place the foundation at the bottom of the sponge, where there's the most space. I use clean, damp sides to spread it more subtly if I apply too much or the color becomes uneven.
This method provides medium coverage, very natural, without any powdery or dry look. The foundation is evenly distributed and blends perfectly with the skin. The downside is lower coverage, and improper use of the sponge can lead to dark spots. Mineral foundation is also less effective with this type of application. Although the sponge doesn't emphasize enlarged pores or scars, it does blend the foundation firmly into the skin, so blemishes will be more visible than with dry mineral application.
There are as many mineral makeup enthusiasts as there are preferences when it comes to applying it. Some prefer a subtle, powdery finish, others a more intense, wet-applied foundation effect. With Annabelle Minerals accessories, you can achieve varying levels of coverage and a completely different finish. The important thing is that these useful gadgets will allow you to enjoy flawless makeup all day long.
Ewa Szałkowska – young , ambitious, and creative. Passionate about art, a lover of good food and dark chocolate, she has been passionate about mineral makeup for several years and is learning it from the ground up. With immense passion, she runs a unique online space where she shares her knowledge and experience in skincare for problematic skin in an accessible and creative way. Founder and author of the blog www.ewaszalkowska.com